
Using AutoMounter
- Allowing Permissions
- Configuration Assistant
- Add a server
- Set mount rules
- Add a share
- Edit or remove a server / share
- Find or reveal a mounted share
- Launch AutoMounter at login
- Outside of /Volumes restrictions
Pro Settings
Managed Settings
FAQs
- How does AutoMounter work?
- Where are my shares mounted?
- What share types are supported?
- DFS shares (SMB)
- NFS mount options
- I purchased the Pro Settings Pack, now what?
- What is the Helper App?
- How do I uninstall the Helper App?
License Activation (non-MAS)
Troubleshooting
- macOS Security & Privacy Settings
- Why do I get asked for a password all the time?
- Why won't my shares appear on the Desktop?
- Why is the Menu Item Hidden?
- What to do if a share won't mount?
- Windows / SMB guest sessions preventing mounts
- I'm having issues installing the Helper App
- The Helper App keeps asking to be installed
- How can I collect logs for support?
Using AutoMounter
Allowing Permissions
When you first open AutoMounter or when it first attempts to mount a share, you may be asked for 'Local Network' permissions. This is required for AutoMounter to check the status of a network service (SMB, etc) before trying to mount your shares.
Additionally, when mounting shares for the first time, there may be a dialog that pops up asking for confirmation for AutoMounter to connect to the server. Please allow this, otherwise AutoMounter will not be able to mount your shares.
See Security & Privacy for details.
Configuration Assistant
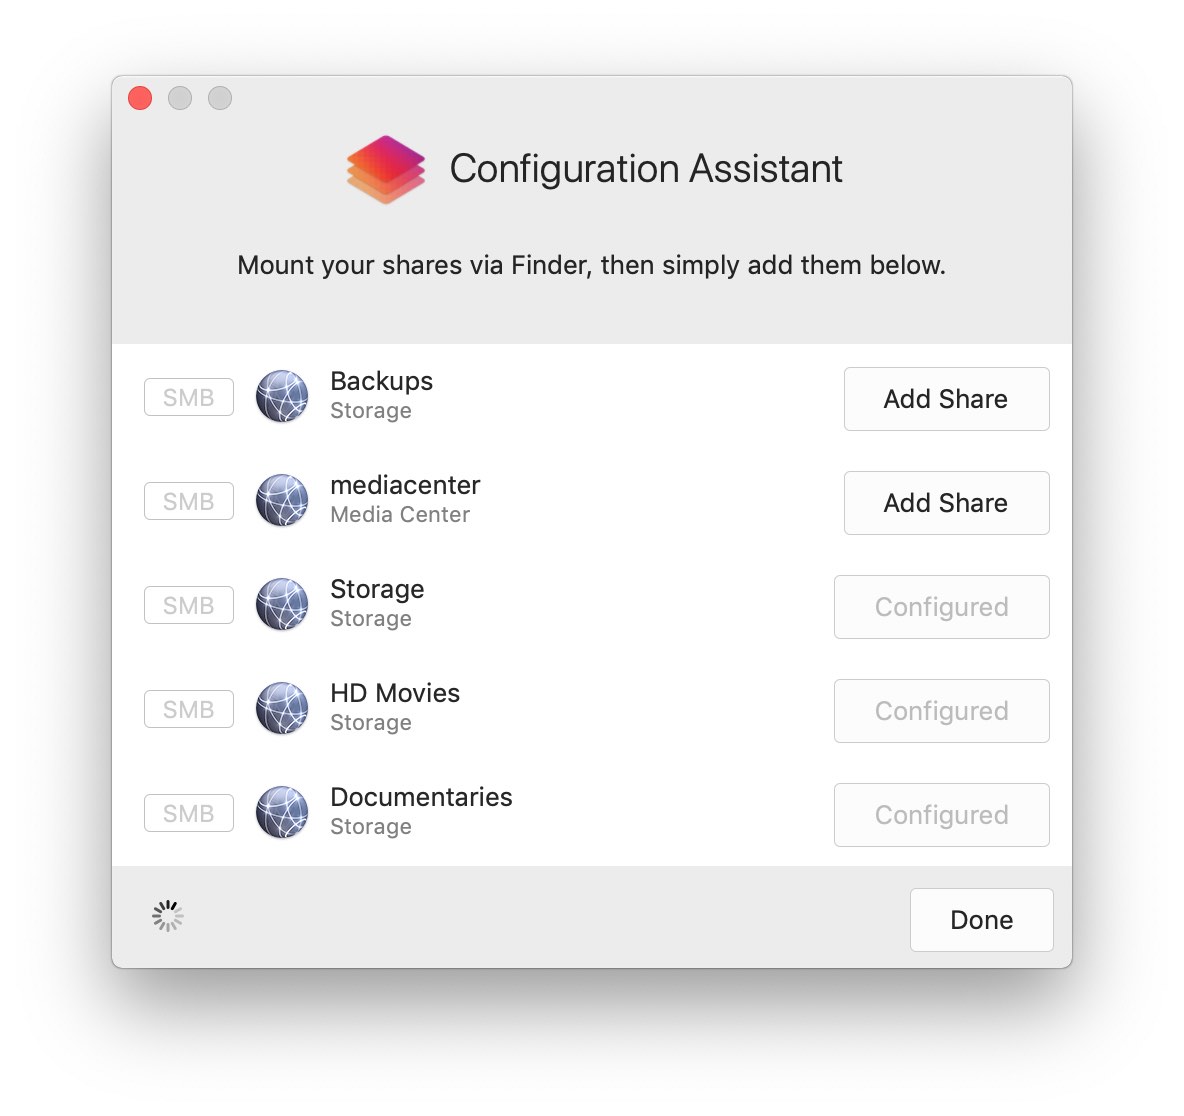
The configuration assistant is the easiest way to add a server or share to AutoMounter. It can configure shares you have already mounted in Finder, and it can also discover servers on your network.
- Optionally mount the shares you want in Finder, so they appear in the assistant
- Click on the Settings cogwheel, then select 'Configuration Assistant...'
- Under Discovered Shares, click 'Add Share' next to any share you want to add
- Under Discovered Servers:
- New servers show 'Configure'. Click it to add the server, even if you have not mounted a share yet.
- Servers already in AutoMounter show 'Add Share'.
- That's it! The servers and shares will be automatically configured within AutoMounter
Add a server
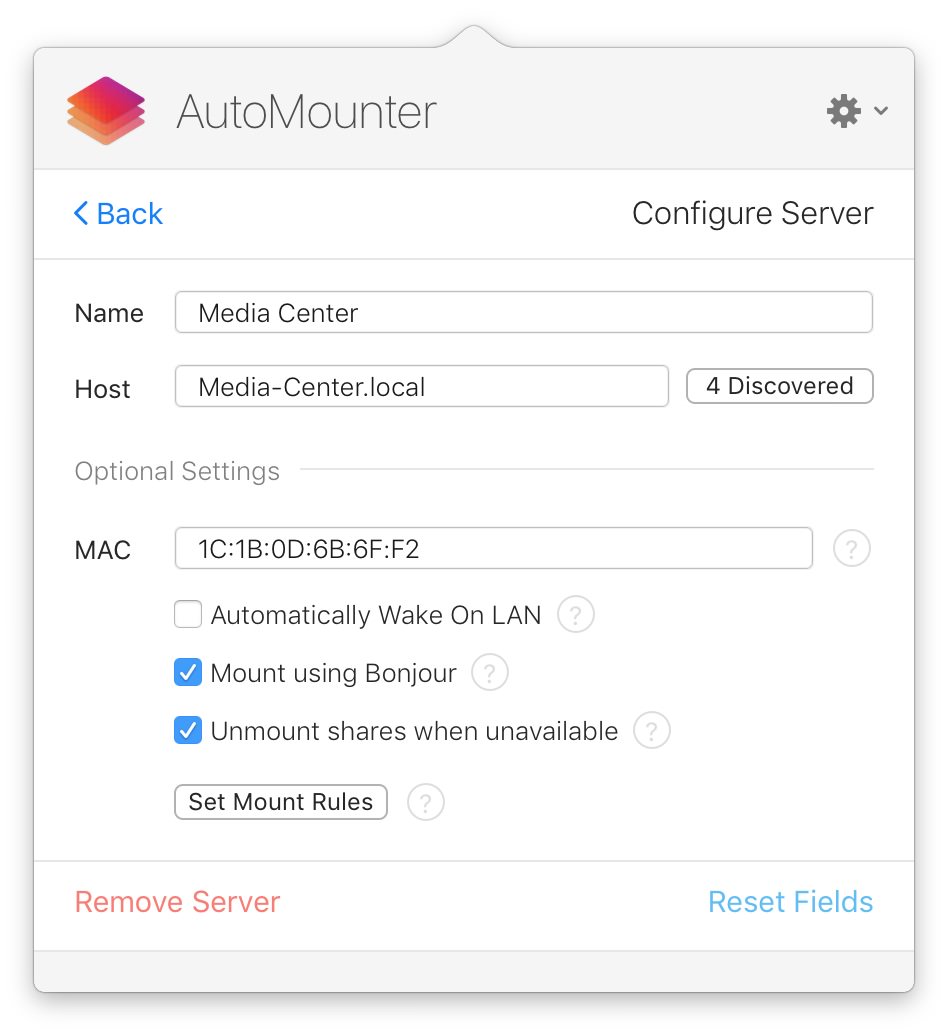
- Click on the Settings cogwheel, and select 'Add Server' (highlighted in screenshot)
- The 'Name' field is simply the name you wish to call this server. Example: 'Home' or 'Work'.
- The 'Host' field is the IP address, hostname, or computer name required to connect to your NAS server.
- Server detection is built in. If servers are found on your network, click the 'Discovered' button and select the server you wish to connect to. This includes Bonjour devices and Windows / PC servers discovered by computer name.
- SMB connections can use a computer name when that is supported. Other share types use the resolved IP address.
- If you don't know your IP address or hostname, try to find these details within your NAS server's configuration interface.
- You can set mount conditions for your server, for example, tying it to a specific WiFi network. For information on how to do this, please see Set mount rules.
- You can also choose to send a Wake-On-LAN packet to your server whenever your network status changes (like opening your laptop, or connecting to your WiFi). You can manually enter the MAC address of your NAS in here as well, which is required for Wake-On-LAN support, and will enable a button in the main panel to wake your server if it's unavailable.
- If your NAS supports Bonjour, tick the 'Mount using Bonjour' checkbox. This enables tight Finder integration with your mounts, which provides a better experience.
- You can also choose to unmount your shares if the server becomes unavailable, which also applies if your mount rule conditions are not met.
- Click the 'Save' button, and the job is done!
Set mount rules
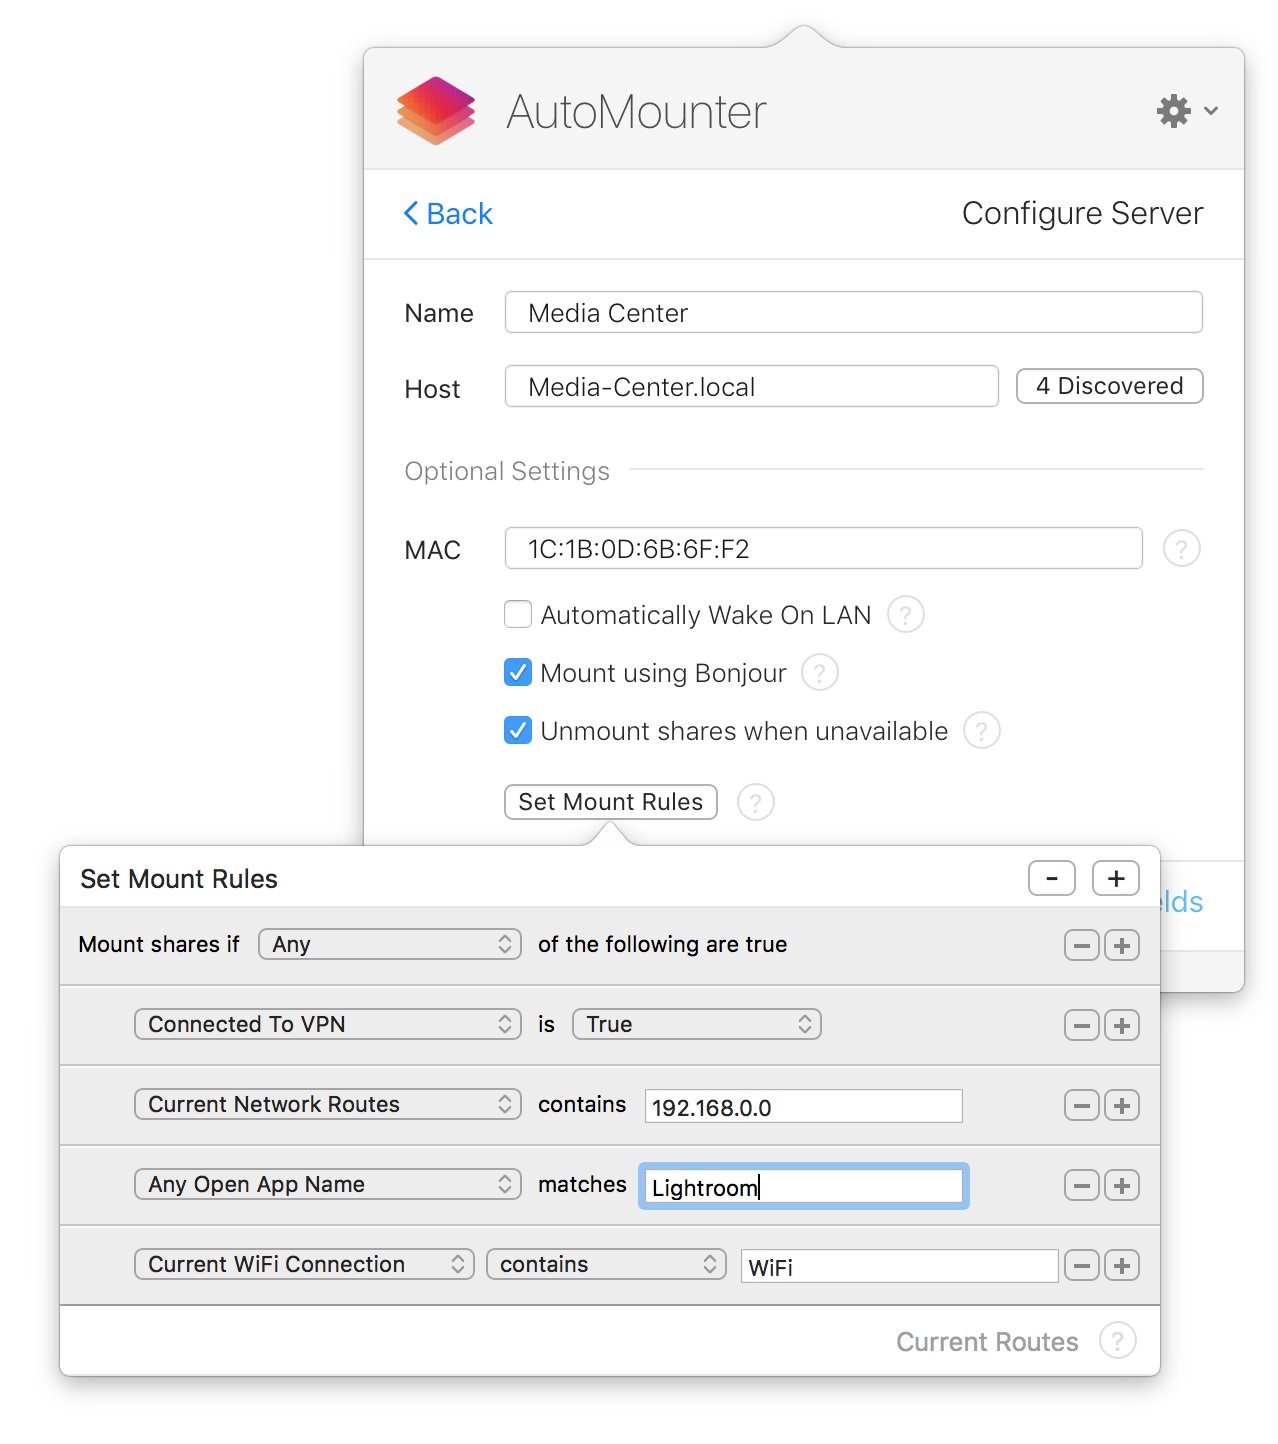
The mount rule editor allows you to define when you'd like the server to start mounting shares. The server will only mount shares if any, all, or none of your rule conditions are met.
- Edit your server
- If you've already configured your server, click the 'Edit' button next to that server.
- To add a new server, see add server above.
- Click the 'Set Mount Rules' button.
- Click any '+' to add a rule.
- Current WiFi Connection: matches against your currently connected WiFi SSID name. You can use is, is not, or contains. (Note: Needs Location Services privacy setting enabled).
- Current 24h Time: define an hour between 0 and 23. You can create multiple time rules to create a range. Example: 16-22.
- Computer Power: matches against your laptop power connection state (connected to power or not).
- Connected to VPN: detects if you're connected to VPN.
- Any Open App Name: matches against any open application name. Example: Safari.
- Current Network Routes: checks if a particular network route is accessible. This can be a destination subnet, an IP address, a MAC address, or a gateway. This is most useful when combined with the VPN rule. You can see all currently accessible routes by clicking on the '?' next to 'Routes' at the bottom of the mount rules panel. Enter the value exactly as shown.
- Current Primary Interface: checks if the current primary interface type matches the chosen interface. Example: WiFi
- Active Interface Name: matches a currently active interface name, user-defined name, or IP address. Example: en0, Wi-Fi, or 192.168.0.159. Current interfaces are listed via the '?' next to 'Interfaces'.
- Can Ping: ensures the IP address / hostname provided responds to ping
- Cannot Ping: ensures the IP address / hostname does not respond to ping
- Path Exists: checks if a local filesystem path exists. Example: /path/to/file
- Path Does Not Exist: checks if a local filesystem path does not exist. Example: /path/to/file
- Locally Mounted Volume Name: checks if an external or internal drive matches the provided name. Example: 'My External Drive'
- Current Focus Allows Mount: matches whether the current macOS Focus mode allows AutoMounter to mount shares. Configure this under System Settings > Focus > [Focus Type] > Focus Filters > AutoMounter.
- External Display Connected: matches whether an external display is connected.
- Pro tip: You can specify that all rules must be met, any rule may be met, or none of the rules may be met.
- 'Rules Established' will appear next to the 'Set Mount Rules' button to let you know your rules have been set.
Add a share
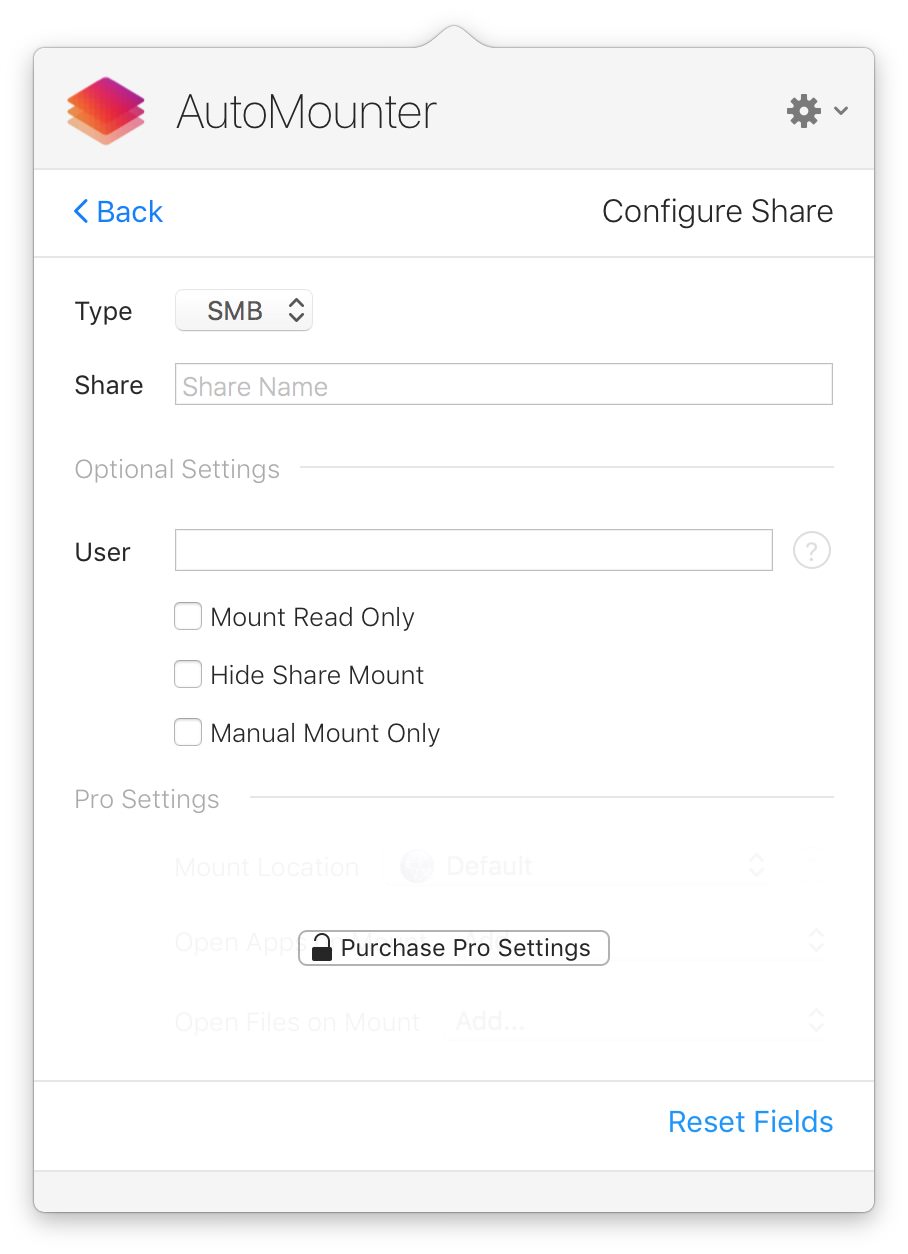
- Once you've configured a server, click on the 'Share +' button.
- Select the share Protocol. If you don't know this, try 'SMB' first. The protocol menu also shows whether that service is currently available on the server.
- Type in the share name, or click 'Discover' to list available shares on the server.
- If you've connected to this server via the Finder before, it will be one of the share names that Finder will list.
- If you don't know the share name, look at your NAS server configuration interface.
- If you're connecting to an NFS share, the share name will be an absolute path of the shared folder on the server. Example, '/exports/Path/To/NFS share'. To set NFS mount options, see NFS mount options.
- For a DFS namespace, enter the path including folders beneath the share, for example 'Namespace/Folder'. Nested mount paths are supported by default. See DFS shares.
- For WebDAV, you can optionally set a port. If the server advertises WebDAV over Bonjour, AutoMounter can fill this in for you.
- Choose Authentication:
- System Managed (recommended): macOS manages credentials. A username is optional.
- Mount as Guest: connect as a guest user.
- Kerberos: use a Kerberos ticket for authentication. Username is optional.
- You can enter %AM_USERNAME% in the username field. This is replaced with the currently logged in short username when the share is mounted.
- Choose Mount Mode:
- Automatic Mount: AutoMounter keeps the share mounted when the server is available.
- Manual Mount: the share is not mounted automatically. A 'Mount' button is shown in the share list instead.
- Select the 'Mount Read Only' checkbox if you want the share to mount read-only (unable to write).
- Select the 'Hide Share Mount' checkbox if you do not want the share to show in the Finder sidebar or Desktop. You can open the share later by pressing the 'Reveal' button in the share list.
- To mount shares in /Volumes, install the AutoMounter Helper app. The Pro Settings pack is not required for /Volumes.
- If you want to mount the share into a custom location, open files, or run scripts when a share mounts, you can purchase the Pro Settings pack. Opening apps on mount also requires Pro Settings. Support for the Pro Settings Pack can be found here.
- Click the 'Save' button
- If this is the first time you've accessed this server, you'll be asked for a username and password. Type in the correct details, and ensure 'Remember this password in my keychain' is checked.
Edit or remove a server / share
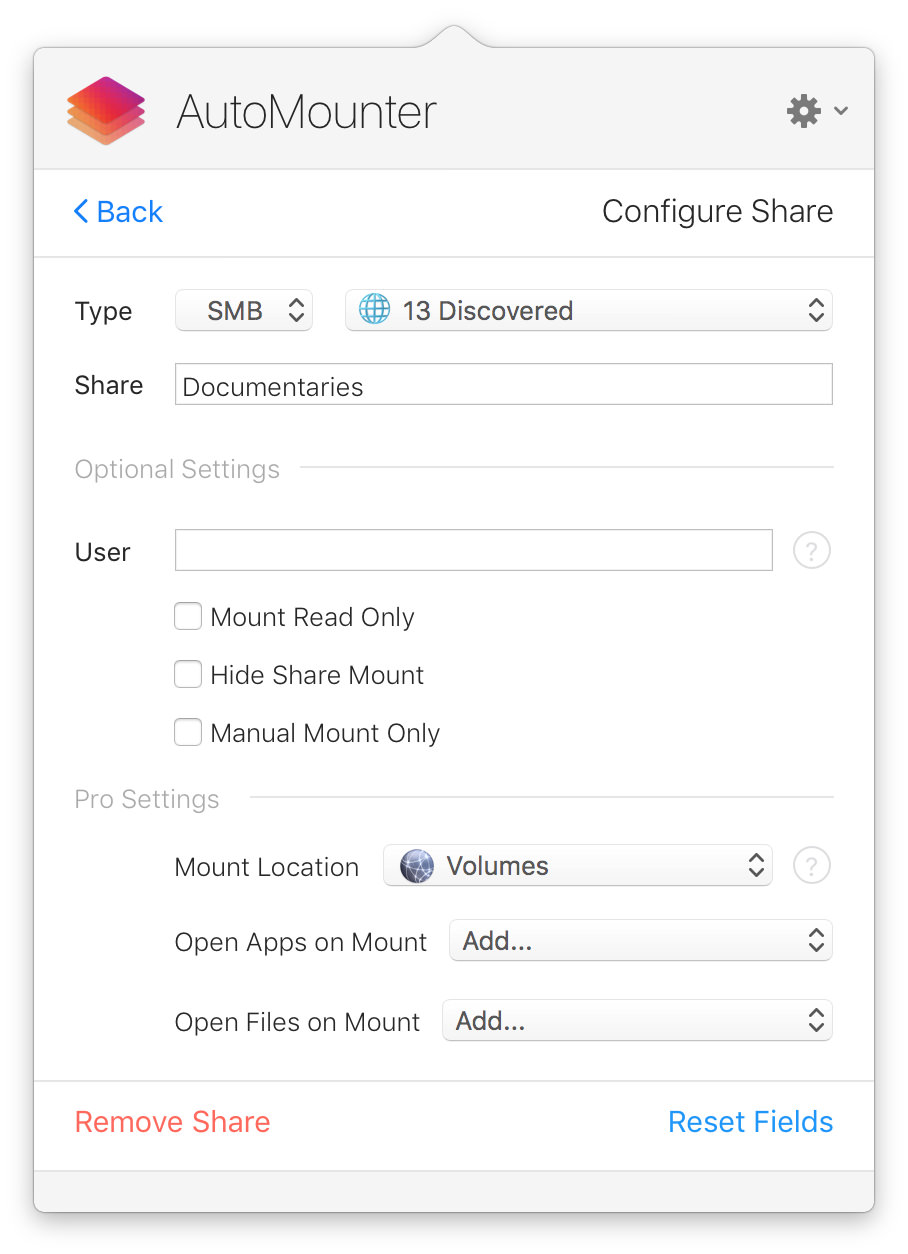
- Click on the 'Edit' button in the server or share list.
- Edit or amend any detail, and click 'Save'.
- If you wish to remove (removes from AutoMounter) the server or share, simply press the 'Remove' button.
Beware: If you remove a server, it will also remove all of its shares.
Find/Reveal a mounted share
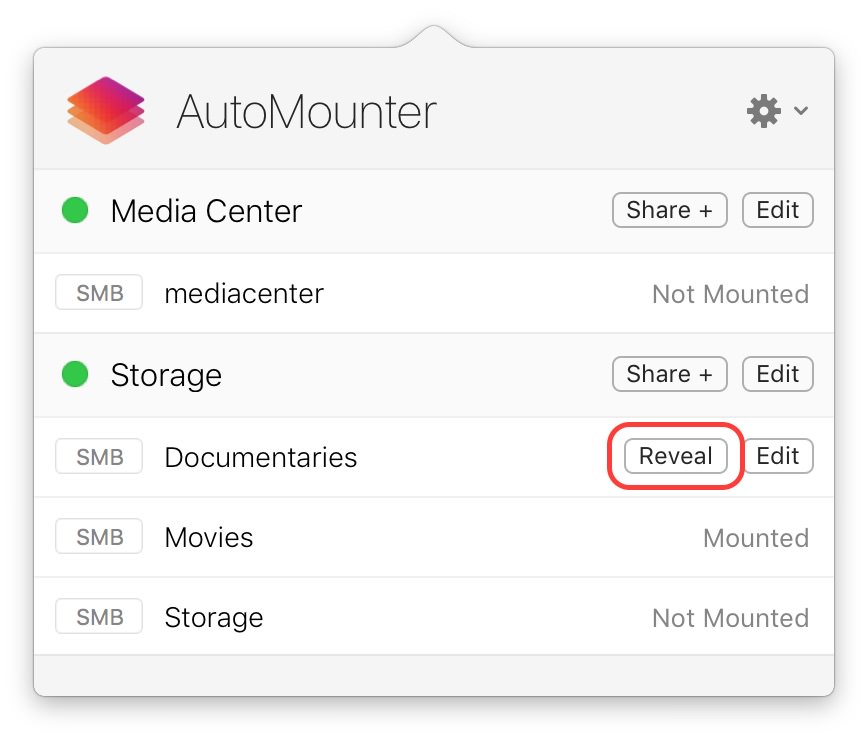
- Hover your mouse over a share, and if it's mounted you will be able to click the 'Reveal' button.
- Doing so will open the share in Finder.
Launch AutoMounter at login
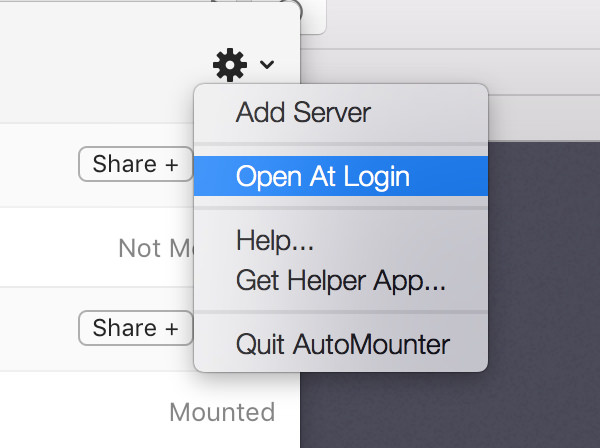
- Go to Preferences and select 'Open at Login'.
Outside of /Volumes restrictions
macOS 26.4 and 26.5 introduced new security behaviour that affects how apps mount network shares outside of the standard /Volumes directory.
If your shares are configured to mount to the Default (User Library Folder) location or any custom path outside of /Volumes, macOS may display a system confirmation dialog before allowing the mount. On those versions, mounts could also fail with a “Permission denied” error.
AutoMounter v1.12+ and AutoMounter Helper v1.8+ restore automatic mounting for the Default location. When Helper is installed, Default (User Library Folder) mounts are redirected to /Volumes, which avoids the confirmation dialog. You do not need to change each share’s Mount Location to Volumes.
Custom mount paths outside /Volumes may still show a macOS confirmation dialog. Helper v1.8+ prevents the “Permission denied” failure for those paths. macOS 26.6+ appears to have relaxed the restriction for Default mounts; Helper is still recommended if you want shares in /Volumes without prompts.
Mac App Store customers
- Update AutoMounter to v1.12 or later from the App Store.
- Download and install the latest AutoMounter Helper from the AutoMounter website.
- Leave shares on Default if you want them mounted in /Volumes automatically, or keep a custom path if you need one.
- If you prefer not to install the helper, you can continue using your existing configuration, but macOS may prompt you to confirm mounts when shares are mounted outside of /Volumes.
Direct (website) customers
- Download and install the latest version of AutoMounter from the website. The direct version mounts in /Volumes by default and does not require the Helper app.
Pro Settings
What is the Pro Settings Pack?
The Mac App Store version of AutoMounter is sandboxed, so some features cannot run without the Helper app. Because the Helper app is optional, these features are offered separately as a Pro Settings in-app purchase. The direct version of AutoMounter includes these features by default, and does not require the Helper app.
Because the Pro Settings features need the Helper app, AutoMounter is priced lower on the Mac App Store. Adding the in-app purchase brings the total to the same price as the direct version.
The Pro Settings in-app purchase unlocks:
- Mounting into a custom location
- Opening apps when a share is mounted
- Opening files when a share is mounted
- Running scripts on mount events
Mounting into /Volumes requires the Helper app, but does not require the Pro Settings pack. Without the Helper app, shares will be mounted into AutoMounter's sandbox container. See Where are my shares mounted?
Pro Settings In-App Purchase
- After adding a server, click '+ Share' to open the share settings.
- Click 'Purchase Pro Settings'.
- To confirm your in-app purchase, click 'Buy Now'.
- If you've already purchased the Pro Settings, you can click 'Restore Purchase'.
- Enter your AppleID and password to complete the purchase.
- Install the AutoMounter Helper app. The Helper app is required to mount shares in /Volumes, and for the Pro Settings features: custom mount locations, opening files, and running scripts.
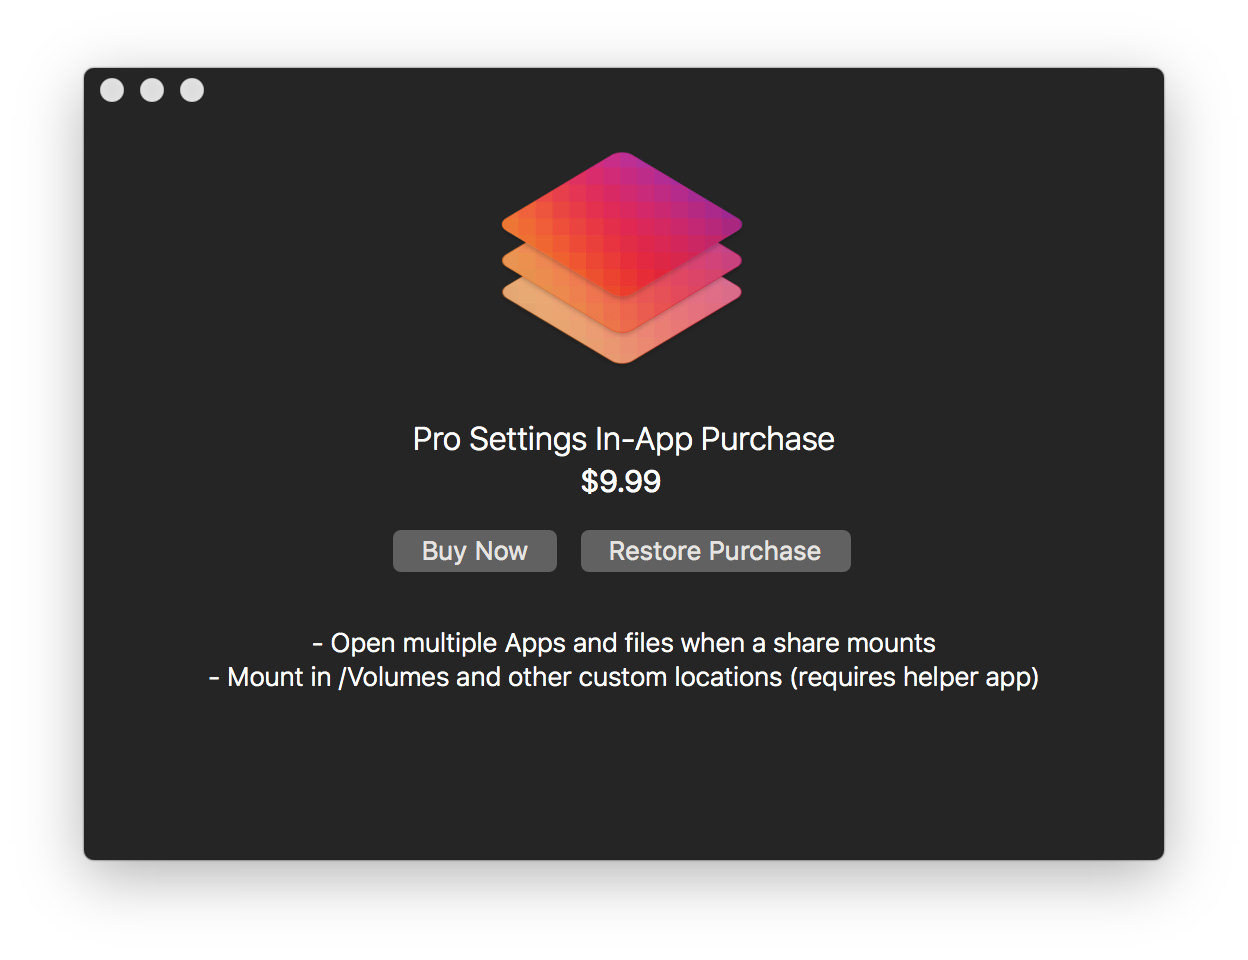
Using the Pro Settings
How to select another mount location
- Ensure AutoMounter Helper has been installed.
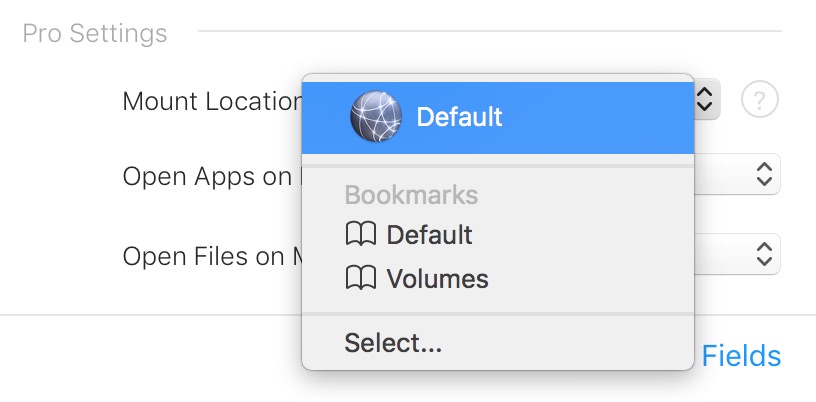
- Click 'Mount Location' and choose Default, /Volumes, or a custom location. With Helper installed, Default mounts in /Volumes.
- A custom location requires the Pro Settings Pack. /Volumes does not.
Configure apps to open when a share is mounted
- Select the 'Open Apps on Mount' drop-down menu, click 'Add', then select the app you'd like to open.
- You can configure multiple applications to open when a share is mounted.
- To remove an application, select the 'Open Apps on Mount' drop-down menu, then select the application, and click 'Remove'.
Choose files to open when a share is mounted
- Ensure AutoMounter Helper has been installed.
- Select the 'Open Files on Mount' drop-down menu, click 'Add', then select the file you'd like to open.
- You can choose to open multiple files when a share is mounted.
- To remove a file, select the 'Open Files on Mount' drop-down menu, then select the file, and click 'Remove'.
Choose scripts to run at mount event
- Ensure AutoMounter Helper has been installed.
- Select the 'Run Scripts' drop-down menu, click 'Add' (or 'Edit' an existing script)
- Browse or type path of the script / command you wish to run. This must be a valid executable file.
- Type in the arguments you want to pass to the script / command. Click the (?) help to see runtime variables generated by AutoMounter that you can utilise.
- Click 'Run At Events...' to select which mount events you'd like the scripts to run at: Mounting, Mounted, Unmounting, Unmounted, and Mount Failed.
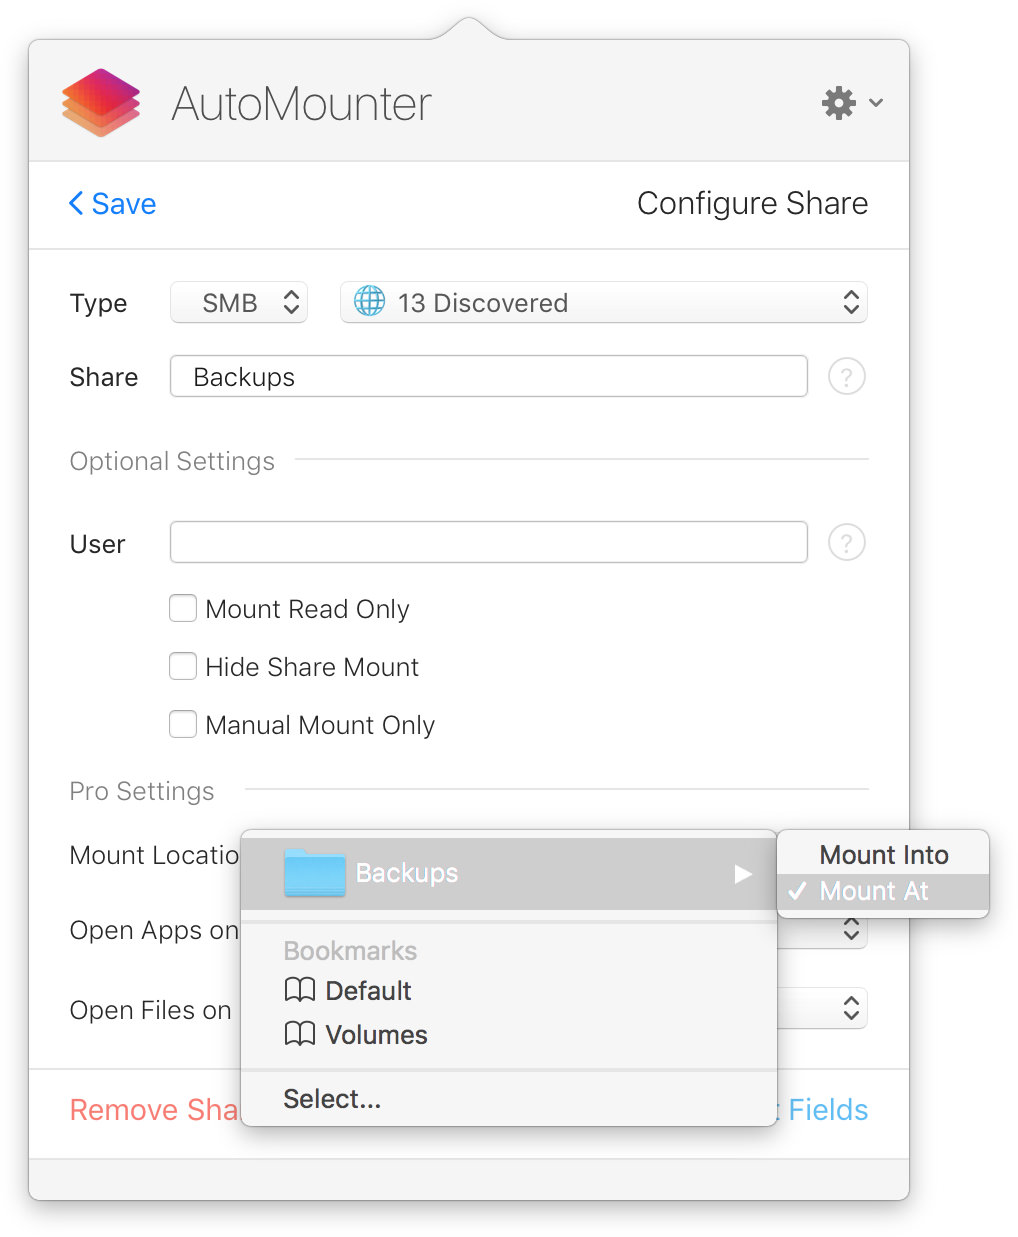
Mount Into or At a Folder (Pro Setting)
AutoMounter and the Pro Settings Pack can now mount into a folder, or mount at a folder. This is shown when you select a custom 'Mount Location' for a share.
Mounting *into* a folder simply means that the share mounts inside the folder you chose. This is the default behaviour.
Mounting *at* the folder effectively replaces the chosen folder by the mount. For example, if you specify the folder /Users/Shared/MyShare then your share, no matter what the share is called, will mount and be accessible at path /Users/Shared/MyShare. It will display in Finder with the folder name replaced with the share name. When the share is ejected, then the folder /Users/Shared/MyShare will return.
Managed Settings
Managed Settings Documentation
Managed settings are configured by setting keys via user defaults, which is the way AutoMounter stores and accesses configuration settings. You can set keys either via a Managed Profile via an XML key (which sets them globally once the profile is loaded), or by setting per-user via the 'defaults' command:
defaults write nz.co.pixeleyes.AutoMounter keyToSet [value]
You can export a Managed Profile template via Preferences > Import / Export Settings, or download the MDM Assistance Package.
User Defaults Keys:
enforceLaunchOnLogin [-bool yes/no]
enforceDisableLaunchOnLogin [-bool yes/no]
- Useful if managing AutoMounter to open at login with a LaunchAgent, force disabled built in Login Item managementunmountOnInterfaceChange [-bool yes/no]
unmountIfPaused [-bool yes/no]
- Unmounts shares if paused. Default behaviour leaves them as is.submountUsesFirstSharePathComponent [-bool yes/no]
- When yes, a nested share path mounts using only the first component: "share/path" -> "share". Leave unset or set to no for DFS. See DFS shares.hideSettingsMenu [-bool yes/no]
keepInDock [-bool yes/no]
- Show AutoMounter in the Dock instead of the menu bardisableConfigurationAssistantMenuItem [-bool yes/no]
disableAddServerMenuItem [-bool yes/no]
disablePreferencesMenuItem [-bool yes/no]
disableQuitMenuItem [-bool yes/no]
managedTheme [Dark/Light]
appIconPath "/path/to/icon.png"
- Path to custom icon to display in AutoMounter windowstatusMenuIcon "/path/to/icon.png"
- Path to custom icon to display in status menu bardisableUpdateCheck [-bool yes/no]
licenseEmailAddress "valid@email.address"
- Runtime variables %AM_USERNAME% and %AM_HOSTNAME% can be specified to include the current username and short hostname. Illegal hostname characters are replaced with '.'. If activation fails three times after launch, further attempts are not continued.licenseCode "license-code"
Import / Export Settings
Preferences > Import / Export Settings can export two different things:
- An AutoMounter settings file (.automountersettings) that imports and exports the current server and share configuration on a Mac. This is for moving or backing up a configuration, and is not a managed MDM profile.
- A Managed Profile template for deploying AutoMounter with MDM.
Before exporting a Managed Profile, first set up the servers and shares how you’d like them to be configured – you can include settings like "Hide share mount", the mount location, and which apps to open upon mount.
In AutoMounter’s preferences, you can choose whether to let the user edit the settings or not, and you can enforce AutoMounter to open at login, and hide the settings menu away from the user. This is great in managed environments, where you may want to ensure your users don’t accidentally quit AutoMounter or remove shares.
Click "Export Managed Profile...", and save the .configprofile file. To import the .configprofile file onto any computer, double-click it. It will then be visible in the “Profiles” pane of Apple’s System Settings. Alternatively, the .configprofile can be deployed with mobile device management (MDM) software, such as Munki or JAMF.
Runtime variable replacement:
- If you edit an exported Managed Profile it shows as an XML file. You can configure a share 'share' and 'username' fields to include "%AM_USERNAME%".
- Once a profile is loaded, AutoMounter replaces %AM_USERNAME% in a share name with the currently logged in username. The same variable can be used in a share username, including for non-managed shares.
- Example: '/homes/%AM_USERNAME%' becomes '/homes/currentusername'
License Activation (non-MAS)
Activation Details
The non Mac App Store version of AutoMounter is activated per computer via a license code. Individual personal licenses allow up to 3 device activations per code.
License information is stored within /Users/Shared/AutoMounter. NOTE: This folder needs to be set to allow read / write permissions for 'everyone', otherwise license activation may fail.
AutoMounter may also add a device identifier to your Keychain in order to keep the activation identifier constant when there are multiple network interfaces available: nz.co.pixeleyes.AutoMounter.deviceIdentifier
In order to activate or deactivate, an internet connection must be available. The following https URLs must be accessible:
- *.paddleapi.com
- *.paddle.com
CLI Activation
It is possible to manage AutoMounter licensing via a built-in command line interface, which is useful for activating AutoMounter in an automated way. If you're using Munki or Jamf you can configure AutoMounter with a post-install or uninstall script to activate or deactivate automatically.
All commands exit with a success status (0) if successful, otherwise exit with a (1) if they fail.
To show all current activations for a provided license code, use the '--showactivations' CLI mode. This shows the activated computer MAC address and date/time when activated.
To deactivate a license, you can use the '--deactivate' CLI mode. If you provide a license code and a MAC address, then that computer will be deactivated. Otherwise, the current license on the running computer will be deactivated.
/Applications/AutoMounter.app/Contents/MacOS/AutoMounter --help
/Applications/AutoMounter.app/Contents/MacOS/AutoMounter --showactivations "licensecode"
/Applications/AutoMounter.app/Contents/MacOS/AutoMounter --activate "email@address.com" "licensecode"
/Applications/AutoMounter.app/Contents/MacOS/AutoMounter --deactivate ["licensecode" "MAC Address"]
/Applications/AutoMounter.app/Contents/MacOS/AutoMounter --islicensed
Managed Profile Activation
It is possible to allow AutoMounter to manage activation automatically by setting the license email address and code within a managed profile. See Managed Settings for key details.
NOTE: If using this method, license code details will be visible to users with access to the defaults command.
FAQs
How does AutoMounter work?
AutoMounter looks at your configured NAS servers, and then efficiently checks if services are available. If a server is available, it will attempt to mount its respective shares. In the event of a network change, like swapping WiFi networks, AutoMounter will re-check all servers to keep everything up to date.
AutoMounter utilises low level macOS frameworks to mount your shares. Doing it this way means we can rely on the operating system to handle authentication to the share, so we don't have to store any of your usernames or passwords.
Where are my shares mounted?
Where shares mount depends on which AutoMounter you are using, and whether Helper is installed.
- Mac App Store without Helper: shares mount in the app sandbox container. These can be referenced at:
~/Library/Containers/nz.co.pixeleyes.AutoMounter/Data/Mounts/
- Mac App Store with Helper: Default mounts are redirected to /Volumes. The Pro Settings Pack is not required for /Volumes.
- Direct (website) version: shares mount in /Volumes by default. Helper is not required.
- Custom locations: available with the Pro Settings Pack (App Store) or in the direct version, and require Helper on the App Store version.
Mounted shares show up on your Desktop and in the Finder sidebar if Finder is set to show connected servers. You can also reveal any mounted share by clicking the 'Reveal' button on the share in the AutoMounter window.
What Share Types are Supported?
AutoMounter supports the following share types. Note any restrictions below, as they may affect how useful AutoMounter will be for NFS / FTP shares.
- SMB / CIFS
- DFS namespaces are configured as SMB shares with a nested path. Nested mount paths are supported by default. See DFS shares.
- WebDAV / WebDAVS
- AFP
- macOS 27 has removed support for AFP. Configured AFP shares stay visible, but they will not be mounted.
- NFS
- Per-share mount options are not set in AutoMounter. Default NFS client options can be added in /etc/nfs.conf. See NFS mount options.
- If the server requires reserved ports (resvport), AutoMounter will not mount the share. AutoMounter does not run as root. On the NFS server, enable connections from non-privileged ports (ports higher than 1024). Linux NFS servers define this as the 'insecure' option, though it's poorly named.
- FTP
- FTP is slowly being phased out on macOS, so mounting via FTP is read-only (no writes).
DFS shares (SMB)
Configure a DFS namespace as an SMB share. Nested mount paths are supported by default.
- Add the server as usual.
- Add a share and set Protocol to SMB.
- In the Share field, enter the DFS path. Example:
Namespace/Folder
- Save.
If you deploy a Managed Profile, nested mount paths stay enabled by default. See Managed Settings.
NFS mount options
AutoMounter does not accept per-share NFS mount options such as vers=3 or resvport. You can still set default NFS client options for the Mac in the system NFS configuration file, /etc/nfs.conf. macOS reads this file before mounting, so AutoMounter NFS mounts pick those options up.
This file is owned by the system. Editing it requires an administrator password, and the options apply to all NFS mounts on the Mac, not only AutoMounter.
- Open Terminal and edit the file:
sudo nano /etc/nfs.conf
- Add or update a line in this form. The value is a comma-separated list, the same format as the mount -o argument:
nfs.client.mount.options = vers=3,rsize=32768,wsize=32768
- Save the file.
- In AutoMounter, eject the NFS share if it is mounted, then let AutoMounter mount it again so the new options take effect.
Useful options (see the mount_nfs man page for the full list):
- rsize — read data size
- wsize — write data size
- resvport — use a reserved socket port
- vers=3 — force NFS version 3
The resvport option uses a reserved port and requires root. AutoMounter does not run as root, so resvport will not work. If the NFS server requires reserved ports, enable connections from non-privileged ports (ports higher than 1024) on the server. Linux NFS servers define this as the 'insecure' option, though it's poorly named.
If you later remove a line from /etc/nfs.conf, the previous value can remain in effect until the Mac is restarted.
What is the Helper App?
The AutoMounter Helper app is required for the Mac App Store version to mount shares in /Volumes. The Pro Settings Pack is not required for /Volumes.
Helper is also required for custom mount locations, opening files on mount, and running scripts. AutoMounter Helper sits idle until it gets a request from AutoMounter to mount a share, open a file, or run a script.
How do I uninstall the Helper App?
You'll need to download the AutoMounter Helper app, and then open the app from the disk image. You'll be presented with an uninstall option.
Otherwise you can remove the helper manually by deleting the following paths, and then restarting your computer:
~/Library/LaunchAgents/nz.co.pixeleyes.AutoMounterHelper.plist
~/Library/AutoMounterHelper
Troubleshooting
macOS Security & Privacy Settings
Apple have added several Security & Privacy settings to macOS over the years, which allows users to control what functionality or information applications have access to. If you are experiencing any issues with basic functionality of AutoMounter, perhaps one of these settings has been disabled. See the list of Security and Privacy settings that AutoMounter uses below, which can be found in System Settings > Privacy & Security.
Local Network
Added in macOS 15, the 'Local Network' setting is required for AutoMounter to check if a network service (like SMB) is available before it attempts a mount of the share. If this setting is turned off, AutoMounter will not function correctly.
Note: A macOS bug could sometimes prevent this setting from applying correctly in some situations, which appears to have been fixed in macOS 15.2, so please ensure you are running the latest macOS version if you are experiencing issues.
If the Local Network setting is enabled for AutoMounter, but you still cannot get it to connect to your servers, go into System Settings > Privacy & Security > Local Network and disable AutoMounter, then delete AutoMounter and re-install from the App Store so it’s located in /Applications. Upon opening AutoMounter, the Local Network setting alert should show up.

Location Services
Added in macOS 14, the 'Location Services' setting is required specifically for the mount rule 'Current WiFi Connection', which allows AutoMounter to get the current WiFi name. If you do not use this mount rule, you can disable Location Services for AutoMounter.
Note: Apple decided that gathering the current WiFi connection name could identify a users location over time, so this ability has been lumped in with the full Location Services privacy setting. While enabling this setting now technically allows AutoMounter to get specific location information, we do not gather or use this information.

Disk Access
The 'Disk Access' setting is required for mounting a share into or at specific directories, or if you call any scripts that access your filesystem. If this setting is turned off, macOS denies AutoMounter access to parts of your filesystem. If you are not experiencing any issues, you do not need to enable this setting.
You can add AutoMounter.app and ~/Library/AutoMounterHelper/AutoMounterHelper.app to 'Full Disk Access'. Alternatively there is more specific filesystem access specified in the 'File & Folders' setting.

Network Volume Confirmation
Added in macOS 12, you may get an additional confirmation dialog box when AutoMounter attempts to mount a share for the first time. This is confirming that you trust AutoMounter to manage mounting your shares. Click 'Connect', or follow this knowledge base article to remove these restrictions, as sometimes the setting does not stick and prevents AutoMounter from mounting shares:
Apple KB Article
Why do I get asked for a password all the time?
This could be for multiple reasons. First, please ensure that you have ticked the 'Remember this password in my keychain' checkbox in the password dialog that macOS shows. If this doesn't work, open Keychain Access (search for it with Spotlight), find items that reference your server, delete them, then try again.
In some cases, this could be related to security measures by asking your permission when AutoMounter attempts to connect to a server. See Security & Privacy for details.
Why won't my shares appear on the Desktop?
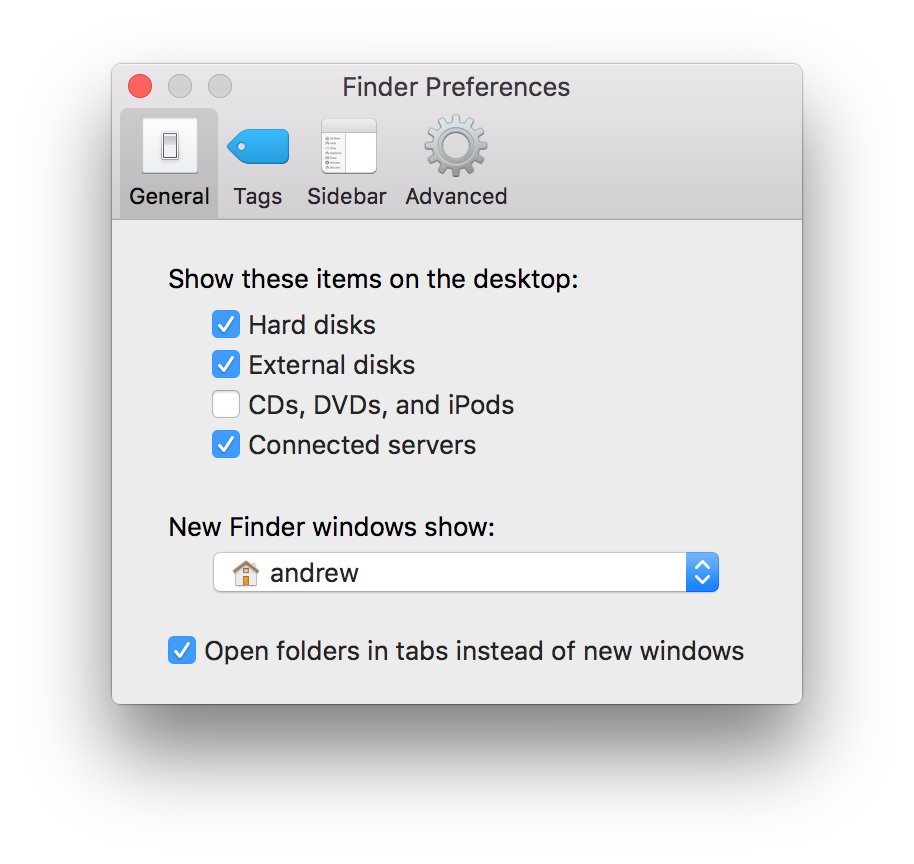
That's disabled by default in Finder. Go to Finder > Settings > General, and check 'Connected Servers' in 'Show these items on the Desktop:'
Why is the Menu Item Hidden?
AutoMounter normally shows an icon in the menu bar. If that icon is missing, one of the following is usually the cause.
- Show AutoMounter in the Dock is enabled. When Preferences > 'Show AutoMounter in the Dock' is turned on, AutoMounter appears in the Dock and the menu bar icon is hidden. Open AutoMounter from the Dock, Spotlight, or the Applications folder, then turn 'Show AutoMounter in the Dock' off in Preferences. The menu bar icon will return.
- Menu Bar item is disabled. macOS can hide an app's menu bar icon. Go to System Settings > Menu Bar, find AutoMounter under 'Allow in the Menu Bar', and make sure it is enabled.
- A third-party menu bar tool has hidden it. Menu bar management tools can hide AutoMounter's icon. Open that tool's settings and show AutoMounter again.
What to do if a share won't mount?
- Firstly, ensure that you are connected to the same network as your NAS server.
- Ensure that the server hostname or IP address is correct in the AutoMounter Server configuration.
- Ensure the share name is correct and matches the share name configured on your NAS exactly.
- Ensure you typed in the correct username / password in the authentication dialogue presented by Finder.
- Look at the server status icon, which is coloured to give you a quick insight on the status:
- Green: the service is up but there is a problem connecting to the share.
- Orange: the service is up but a mount rule not meeting its criteria is preventing shares from mounting, or Bonjour might be unavailable.
- Grey: AutoMounter can't connect to the server, the service might be down.
- Pro tip: You can click on the status icon for further information.
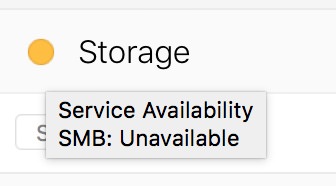
- If the server status icon is always showing grey, it may be that the AutoMounter 'Local Network' permission has been turned off. See Security & Privacy for details.
- If you want to mount in /Volumes or a custom location, install the AutoMounter Helper app. Custom locations also require the Pro Settings Pack on the App Store version.
- If a Windows / SMB server previously mounted as Guest, that session can block later authenticated mounts, including mounts to other servers. See Windows / SMB guest sessions.
- If you're having issues mounting to custom paths, it could be that AutoMounter or AutoMounterHelper doesn't have access. See Security & Privacy for details.
- If you've specified a username in the AutoMounter share configurations, try removing this for each share. Specifying a username changes the way the service sessions are created, which could be causing the problem.
If you're still having issues, feel free to Contact Us
Windows / SMB guest sessions preventing mounts
macOS can keep a Guest session open to a Windows / SMB server. That guest session can prevent later authenticated mounts of other shares on the same server, and it can also prevent mounts to other servers.
- In Finder, eject any Guest-mounted shares, including those from other Windows / SMB servers.
- In AutoMounter, edit the share and set Authentication to System Managed (or Kerberos), not Mount as Guest.
- Open Keychain Access (search for it with Spotlight) and remove items that reference that server, especially any guest or GUEST entries.
- Try mounting again, and save the username and password to the keychain when macOS asks.
If the share is meant to be a guest share, keep Authentication set to Mount as Guest.
I'm having issues installing the Helper App
If you're seeing a permissions error when installing the Helper App, it's likely that your home folder permissions aren't quite right. This can cause issues with other applications too, so the best option is to reset your home folder permissions to what they should be.
Copy and paste the following command into /Applications/Utilities/Terminal.app, and hit enter. This command resets your home folder permissions.
diskutil resetUserPermissions / $(id -u)
The Helper App keeps asking to be installed
If you've installed the Helper App, and on the next restart or login AutoMounter asks for it to be installed again, you may need to enable the login item.
Go to System Settings > General > Login Items, and ensure the 'Pixeleyes Ltd' or 'AutoMounterHelper.app' background login item is enabled.
It is also possible that the LaunchAgent is being removed by macOS maintenance apps like MacCleaner. The LaunchAgent should exist here:
~/Library/LaunchAgents/nz.co.pixeleyes.AutoMounterHelper.plist
How can I collect logs for support?
All users:
- Provide as much detail as possible about your issue.
- Take a screenshot of the AutoMounter window, including screenshots of the server and share configurations.
Shortcut for taking screenshot is: ⌘ + shift + 4 (then drag mouse)
- If you are experiencing an issue mounting share, try mounting the share via Finder and then send us the output of the following terminal command:
mount
- Send your configuration:
/Applications/AutoMounter.app/Contents/MacOS/AutoMounter --showconfig
- Open /Applications/Utilities/Terminal.app, and paste the following command, then provide us with the output:
log show --predicate '(process == "AutoMounter" || process == "AutoMounterHelper") and (eventType == logEvent) and (NOT subsystem CONTAINS "com.apple.")' --last 7d